SearXNG
This tutorial is a community contribution and is not supported by the Sage WebUI team. It serves only as a demonstration on how to customize Sage WebUI for your specific use case. Want to contribute? Check out the contributing tutorial.
This guide provides instructions on how to set up web search capabilities in Sage Open WebUI using SearXNG in Docker.
SearXNG (Docker)
"SearXNG is a free internet metasearch engine which aggregates results from various search services and databases. Users are neither tracked nor profiled."
1. SearXNG Configuration
To configure SearXNG optimally for use with Sage WebUI, follow these steps:
Step 1: git clone SearXNG Docker and navigate to the folder:
- Create a New Directory
searxng-docker
Clone the searxng-docker repository. This folder will contain your SearXNG configuration files. Refer to the SearXNG documentation for configuration instructions.
git clone https://github.com/searxng/searxng-docker.git
Navigate to the searxng-docker repository:
cd searxng-docker
Step 2: Locate and and modify the .env file:
- Uncomment
SEARXNG_HOSTNAMEfrom the.envfile and set it accordingly:
# By default listen on https://localhost
# To change this:
# * uncomment SEARXNG_HOSTNAME, and replace <host> by the SearXNG hostname
# * uncomment LETSENCRYPT_EMAIL, and replace <email> by your email (require to create a Let's Encrypt certificate)

SEARXNG_HOSTNAME=localhost:8080/
# LETSENCRYPT_EMAIL=<email>

# Optional:
# If you run a very small or a very large instance, you might want to change the amount of used uwsgi workers and threads per worker
# More workers (= processes) means that more search requests can be handled at the same time, but it also causes more resource usage

# SEARXNG_UWSGI_WORKERS=4
# SEARXNG_UWSGI_THREADS=4
Step 3: Modify the docker-compose.yaml file
- Remove the
localhostrestriction by modifying thedocker-compose.yamlfile:
sed -i "s/127.0.0.1:8080/0.0.0.0:8080/"
Step 4: Grant Necessary Permissions
- Allow the container to create new config files by running the following command in the root directory:
sudo chmod a+rwx searxng-docker/searxng
Step 5: Create a Non-Restrictive limiter.toml File
- Create a non-restrictive
searxng-docker/searxng/limiter.tomlconfig file:
searxng-docker/searxng/limiter.toml
# This configuration file updates the default configuration file
# See https://github.com/searxng/searxng/blob/master/searx/botdetection/limiter.toml

[botdetection.ip_limit]
# activate link_token method in the ip_limit method
link_token = false

[botdetection.ip_lists]
block_ip = []
pass_ip = []
Step 6: Remove the Default settings.yml File
- Delete the default
searxng-docker/searxng/settings.ymlfile if it exists, as it will be regenerated on the first launch of SearXNG:
rm searxng-docker/searxng/settings.yml
Step 7: Create a Fresh settings.yml File
On the first run, you must remove cap_drop: - ALL from the docker-compose.yaml file for the searxng service to successfully create /etc/searxng/uwsgi.ini. This is necessary because the cap_drop: - ALL directive removes all capabilities, including those required for the creation of the uwsgi.ini file. After the first run, you should re-add cap_drop: - ALL to the docker-compose.yaml file for security reasons.
- Bring up the container momentarily to generate a fresh settings.yml file:
docker compose up -d ; sleep 10 ; docker compose down
Step 8: Add Formats and Update Port Number
- Add HTML and JSON formats to the
searxng-docker/searxng/settings.ymlfile:
sed -i 's/formats: \[\"html\"\/]/formats: [\"html\", \"json\"]/' searxng-docker/searxng/settings.yml
Generate a secret key for your SearXNG instance:
sed -i "s|ultrasecretkey|$(openssl rand -hex 32)|g" searxng-docker/searxng/settings.yml
Windows users can use the following powershell script to generate the secret key:
$randomBytes = New-Object byte[] 32
(New-Object Security.Cryptography.RNGCryptoServiceProvider).GetBytes($randomBytes)
$secretKey = -join ($randomBytes | ForEach-Object { "{0:x2}" -f $_ })
(Get-Content searxng-docker/searxng/settings.yml) -replace 'ultrasecretkey', $secretKey | Set-Content searxng-docker/searxng/settings.yml
Update the port number in the server section to match the one you set earlier (in this case, 8080):
sed -i 's/port: 8080/port: 8080/' searxng-docker/searxng/settings.yml
Change the bind_address as desired:
sed -i 's/bind_address: "0.0.0.0"/bind_address: "127.0.0.1"/' searxng-docker/searxng/settings.yml
Configuration Files
searxng-docker/searxng/settings.yml (Extract)
The default settings.yml file contains many engine settings. Below is an extract of what the default settings.yml file might look like:
searxng-docker/searxng/settings.yml
# see https://docs.searxng.org/admin/settings/settings.html#settings-use-default-settings
use_default_settings: true

server:
  # base_url is defined in the SEARXNG_BASE_URL environment variable, see .env and docker-compose.yml
  secret_key: "ultrasecretkey"  # change this!
  limiter: true  # can be disabled for a private instance
  image_proxy: true
  port: 8080
  bind_address: "0.0.0.0"

ui:
  static_use_hash: true

search:
  safe_search: 0
  autocomplete: ""
  default_lang: ""
  formats:
    - html
    - json # json is required
  # remove format to deny access, use lower case.
  # formats: [html, csv, json, rss]
redis:
  # URL to connect redis database. Is overwritten by ${SEARXNG_REDIS_URL}.
  # https://docs.searxng.org/admin/settings/settings_redis.html#settings-redis
  url: redis://redis:6379/0
The port in the settings.yml file for SearXNG should match that of the port number in your docker-compose.yml file for SearXNG.
Step 9: Update uwsgi.ini File
- Ensure your
searxng-docker/searxng/uwsgi.inifile matches the following:
searxng-docker/searxng/uwsgi.ini
[uwsgi]
# Who will run the code
uid = searxng
gid = searxng

# Number of workers (usually CPU count)
# default value: %k (= number of CPU core, see Dockerfile)
workers = %k

# Number of threads per worker
# default value: 4 (see Dockerfile)
threads = 4

# The right granted on the created socket
chmod-socket = 666

# Plugin to use and interpreter config
single-interpreter = true
master = true
plugin = python3
lazy-apps = true
enable-threads = 4

# Module to import
module = searx.webapp

# Virtualenv and python path
pythonpath = /usr/local/searxng/
chdir = /usr/local/searxng/searx/

# automatically set processes name to something meaningful
auto-procname = true

# Disable request logging for privacy
disable-logging = true
log-5xx = true

# Set the max size of a request (request-body excluded)
buffer-size = 8192

# No keep alive
# See https://github.com/searx/searx-docker/issues/24
add-header = Connection: close

# uwsgi serves the static files
static-map = /static=/usr/local/searxng/searx/static
# expires set to one day
static-expires = /* 86400
static-gzip-all = True
offload-threads = 4
2. Alternative Setup
Alternatively, if you don't want to modify the default configuration, you can simply create an empty searxng-docker folder and follow the rest of the setup instructions.
Docker Compose Setup
Add the following environment variables to your Sage WebUI docker-compose.yaml file:
services:
  sage-open-webui:
    environment:
      ENABLE_RAG_WEB_SEARCH: True
      RAG_WEB_SEARCH_ENGINE: "searxng"
      RAG_WEB_SEARCH_RESULT_COUNT: 3
      RAG_WEB_SEARCH_CONCURRENT_REQUESTS: 10
      SEARXNG_QUERY_URL: "http://searxng:8080/search?q=<query>"
Create a .env file for SearXNG:
# SearXNG
SEARXNG_HOSTNAME=localhost:8080/
Next, add the following to SearXNG's docker-compose.yaml file:
services:
  searxng:
    container_name: searxng
    image: searxng/searxng:latest
    ports:
      - "8080:8080"
    volumes:
      - ./searxng:/etc/searxng:rw
    env_file:
      - .env
    restart: unless-stopped
    cap_drop:
      - ALL
    cap_add:
      - CHOWN
      - SETGID
      - SETUID
      - DAC_OVERRIDE
    logging:
      driver: "json-file"
      options:
        max-size: "1m"
        max-file: "1"
Your stack is ready to be launched with:
docker compose up -d
On the first run, you must remove cap_drop: - ALL from the docker-compose.yaml file for the searxng service to successfully create /etc/searxng/uwsgi.ini. This is necessary because the cap_drop: - ALL directive removes all capabilities, including those required for the creation of the uwsgi.ini file. After the first run, you should re-add cap_drop: - ALL to the docker-compose.yaml file for security reasons.
Alternatively, you can run SearXNG directly using docker run:
docker run --name searxng --env-file .env -v ./searxng:/etc/searxng:rw -p 8080:8080 --restart unless-stopped --cap-drop ALL --cap-add CHOWN --cap-add SETGID --cap-add SETUID --cap-add DAC_OVERRIDE --log-driver json-file --log-opt max-size=1m --log-opt max-file=1 searxng/searxng:latest
3. Confirm Connectivity
Confirm connectivity to SearXNG from your Sage WebUI container instance in your command line interface:
docker exec -it sage-open-webui curl http://host.docker.internal:8080/search?q=this+is+a+test+query&format=json
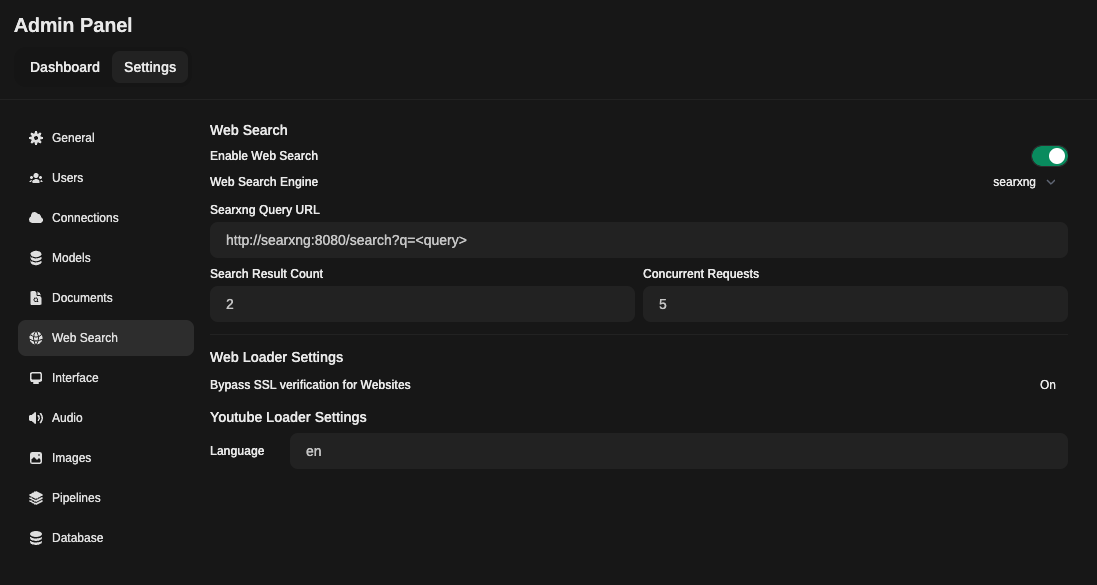
4. GUI Configuration
- Navigate to:
Admin Panel->Settings->Web Search - Toggle
Enable Web Search - Set
Web Search Enginefrom dropdown menu tosearxng - Set
Searxng Query URLto one of the following examples:
http://searxng:8080/search?q=<query>(using the container name and exposed port, suitable for Docker-based setups)http://host.docker.internal:8080/search?q=<query>(using thehost.docker.internalDNS name and the host port, suitable for Docker-based setups)http://<searxng.local>/search?q=<query>(using a local domain name, suitable for local network access)https://<search.domain.com>/search?q=<query>(using a custom domain name for a SearXNG instance, suitable for public or private access)
Do note the /search?q=<query> part is mandatory.
5. Adjust the Search Result Count and Concurrent Requests values accordingly
6. Save changes
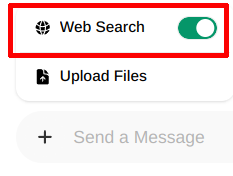
5. Using Web Search in a Chat
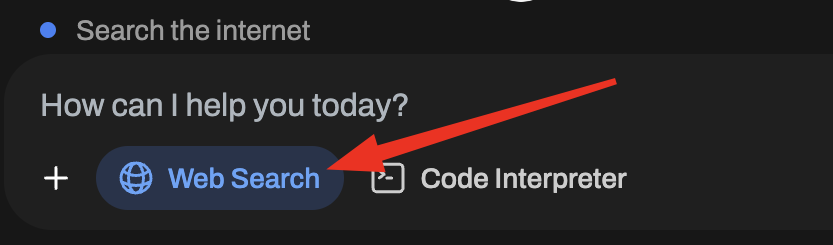
To access Web Search, Click on the + next to the message input field.
Here you can toggle Web Search On/Off.

By following these steps, you will have successfully set up SearXNG with Sage WebUI, enabling you to perform web searches using the SearXNG engine.
Note
You will have to explicitly toggle this On/Off in a chat.
This is enabled on a per session basis eg. reloading the page, changing to another chat will toggle off.
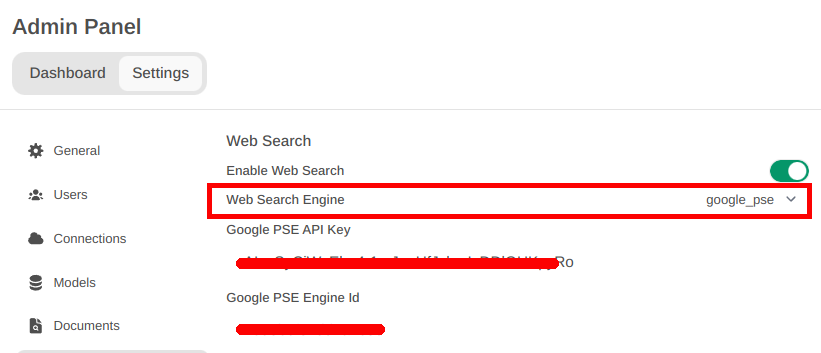
Google PSE API
Setup
- Go to Google Developers, use Programmable Search Engine, and log on or create account.
- Go to control panel and click
Addbutton - Enter a search engine name, set the other properties to suit your needs, verify you're not a robot and click
Createbutton. - Generate
API keyand get theSearch engine ID. (Available after the engine is created) - With
API keyandSearch engine ID, openSage WebUI Admin paneland clickSettingstab, and then clickWeb Search - Enable
Web searchand SetWeb Search Enginetogoogle_pse - Fill
Google PSE API Keywith theAPI keyandGoogle PSE Engine Id(# 4) - Click
Save
Note
You have to enable Web search in the prompt field, using plus (+) button.
Search the web ;-)
Brave API
Docker Compose Setup
Add the following environment variables to your Sage WebUI docker-compose.yaml file:
services:
  sage-open-webui:
    environment:
      ENABLE_RAG_WEB_SEARCH: True
      RAG_WEB_SEARCH_ENGINE: "brave"
      BRAVE_SEARCH_API_KEY: "YOUR_API_KEY"
      RAG_WEB_SEARCH_RESULT_COUNT: 3
      RAG_WEB_SEARCH_CONCURRENT_REQUESTS: 10
Mojeek Search API
Setup
- Please visit Mojeek Search API page to obtain an
API key - With
API key, openSage WebUI Admin paneland clickSettingstab, and then clickWeb Search - Enable
Web searchand SetWeb Search Enginetomojeek - Fill
Mojeek Search API Keywith theAPI key - Click
Save
Docker Compose Setup
Add the following environment variables to your Sage WebUI docker-compose.yaml file:
services:
  sage-open-webui:
    environment:
      ENABLE_RAG_WEB_SEARCH: True
      RAG_WEB_SEARCH_ENGINE: "mojeek"
      BRAVE_SEARCH_API_KEY: "YOUR_MOJEEK_API_KEY"
      RAG_WEB_SEARCH_RESULT_COUNT: 3
      RAG_WEB_SEARCH_CONCURRENT_REQUESTS: 10
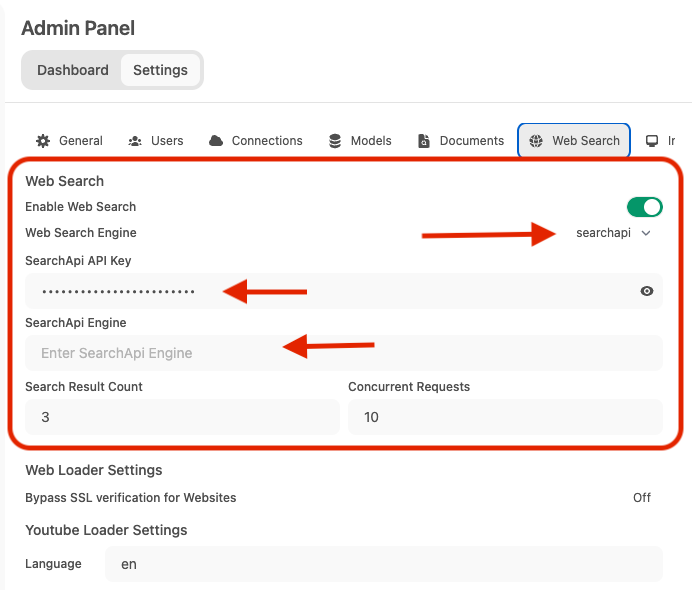
SearchApi API
SearchApi is a collection of real-time SERP APIs. Any existing or upcoming SERP engine that returns organic_results is supported. The default web search engine is google, but it can be changed to bing, baidu, google_news, bing_news, google_scholar, google_patents, and others.
Setup
- Go to SearchApi, and log on or create a new account.
- Go to
Dashboardand copy the API key. - With
API key, openSage WebUI Admin paneland clickSettingstab, and then clickWeb Search. - Enable
Web searchand setWeb Search Enginetosearchapi. - Fill
SearchApi API Keywith theAPI keythat you copied in step 2 from SearchApi dashboard. - [Optional] Enter the
SearchApi enginename you want to query. Example,google,bing,baidu,google_news,bing_news,google_videos,google_scholarandgoogle_patents.By default, it is set togoogle. - Click
Save.
Note
You have to enable Web search in the prompt field, using plus (+) button to search the web using SearchApi engines.
Kagi API
Coming Soon
Setup
Serpstack API
Coming Soon
Setup
Serper API
Coming Soon
Setup
Serply API
Coming Soon
Setup
DuckDuckGo API
Setup
No setup is required to use DuckDuckGo API for Sage WebUI's built in web search! DuckDuckGo works out of the box in Sage WebUI.
There is a possibility of your web searches being rate limited.
Tavily API
Coming Soon
Setup
Jina API
Coming Soon
Setup
Bing API
Setup
- Navigate to the AzurePortal and create a new resource. After creation, you’ll be redirected to the resource overview page. From there, select "Click here to manage keys."
- On the key management page, locate Key1 or Key2 and copy your desired key.
- Open the Sage WebUI Admin Panel, switch to the Settings tab, and then select Web Search.
- Enable the Web search option and set the Web Search Engine to bing.
- Fill
SearchApi API Keywith theAPI keythat you copied in step 2 from AzurePortal dashboard. - Click
Save.