This tutorial is a community contribution and is not supported by the Sage WebUI team. It serves only as a demonstration on how to customize Sage WebUI for your specific use case. Want to contribute? Check out the contributing tutorial.
🎨 Image Generation
Sage WebUI supports image generation through three backends: AUTOMATIC1111, ComfyUI, and OpenAI DALL·E. This guide will help you set up and use either of these options.
AUTOMATIC1111
Sage WebUI supports image generation through the AUTOMATIC1111 API. Here are the steps to get started:
Initial Setup
-
Ensure that you have AUTOMATIC1111 installed.
-
Launch AUTOMATIC1111 with additional flags to enable API access:
./webui.sh --api --listen -
For Docker installation of WebUI with the environment variables preset, use the following command:
docker run -d -p 3000:8080 --add-host=host.docker.internal:host-gateway -e AUTOMATIC1111_BASE_URL=http://host.docker.internal:7860/ -e ENABLE_IMAGE_GENERATION=True -v sage-open-webui:/app/backend/data --name sage-open-webui --restart always ghcr.io/Startr/AI-WEB-openwebui:main
Setting Up Sage WebUI with AUTOMATIC1111
-
In Sage WebUI, navigate to the Admin Panel > Settings > Images menu.
-
Set the
Image Generation Enginefield toDefault (Automatic1111). -
In the API URL field, enter the address where AUTOMATIC1111's API is accessible:
http://<your_automatic1111_address>:7860/If you're running a Docker installation of Sage WebUI and AUTOMATIC1111 on the same host, use
http://host.docker.internal:7860/as your address.
ComfyUI
ComfyUI provides an alternative interface for managing and interacting with image generation models. Learn more or download it from its GitHub page. Below are the setup instructions to get ComfyUI running alongside your other tools.
Initial Setup
-
Download and extract the ComfyUI software package from GitHub to your desired directory.
-
To start ComfyUI, run the following command:
python main.pyFor systems with low VRAM, launch ComfyUI with additional flags to reduce memory usage:
python main.py --lowvram -
For Docker installation of WebUI with the environment variables preset, use the following command:
docker run -d -p 3000:8080 --add-host=host.docker.internal:host-gateway -e COMFYUI_BASE_URL=http://host.docker.internal:7860/ -e ENABLE_IMAGE_GENERATION=True -v sage-open-webui:/app/backend/data --name sage-open-webui --restart always ghcr.io/Startr/AI-WEB-openwebui:main
Setting Up Sage WebUI with ComfyUI
Setting Up FLUX.1 Models
- Model Checkpoints:
- Download either the
FLUX.1-schnellorFLUX.1-devmodel from the black-forest-labs HuggingFace page. - Place the model checkpoint(s) in both the
models/checkpointsandmodels/unetdirectories of ComfyUI. Alternatively, you can create a symbolic link betweenmodels/checkpointsandmodels/unetto ensure both directories contain the same model checkpoints.
- VAE Model:
- Download
ae.safetensorsVAE from here. - Place it in the
models/vaeComfyUI directory.
- CLIP Model:
- Download
clip_l.safetensorsfrom here. - Place it in the
models/clipComfyUI directory.
- T5XXL Model:
- Download either the
t5xxl_fp16.safetensorsort5xxl_fp8_e4m3fn.safetensorsmodel from here. - Place it in the
models/clipComfyUI directory.
To integrate ComfyUI into Sage WebUI, follow these steps:
Step 1: Configure Sage WebUI Settings
- Navigate to the Admin Panel in Sage WebUI.
- Click on Settings and then select the Images tab.
- In the
Image Generation Enginefield, chooseComfyUI. - In the API URL field, enter the address where ComfyUI's API is accessible, following this format:
http://<your_comfyui_address>:8188/.- Set the environment variable
COMFYUI_BASE_URLto this address to ensure it persists within the WebUI.
- Set the environment variable
Step 2: Verify the Connection and Enable Image Generation
- Ensure ComfyUI is running and that you've successfully verified the connection to Sage WebUI. You won't be able to proceed without a successful connection.
- Once the connection is verified, toggle on Image Generation (Experimental). More options will be presented to you.
- Continue to step 3 for the final configuration steps.
Step 3: Configure ComfyUI Settings and Import Workflow
- Enable developer mode within ComfyUI. To do this, look for the gear icon above the Queue Prompt button within ComfyUI and enable the
Dev Modetoggle. - Export the desired workflow from ComfyUI in
API formatusing theSave (API Format)button. The file will be downloaded asworkflow_api.jsonif done correctly. - Return to Sage WebUI and click the Click here to upload a workflow.json file button.
- Select the
workflow_api.jsonfile to import the exported workflow from ComfyUI into Sage WebUI. - After importing the workflow, you must map the
ComfyUI Workflow Nodesaccording to the imported workflow node IDs. - Set
Set Default Modelto the name of the model file being used, such asflux1-dev.safetensors
You may need to adjust an Input Key or two within Sage WebUI's ComfyUI Workflow Nodes section to match a node within your workflow.
For example, seed may need to be renamed to noise_seed to match a node ID within your imported workflow.
Some workflows, such as ones that use any of the Flux models, may utilize multiple nodes IDs that is necessary to fill in for their node entry fields within Sage WebUI. If a node entry field requires multiple IDs, the node IDs should be comma separated (e.g. 1 or 1, 2).
- Click
Saveto apply the settings and enjoy image generation with ComfyUI integrated into Sage WebUI!
After completing these steps, your ComfyUI setup should be integrated with Sage WebUI, and you can use the Flux.1 models for image generation.
Configuring with SwarmUI
SwarmUI utilizes ComfyUI as its backend. In order to get Sage WebUI to work with SwarmUI you will have to append ComfyBackendDirect to the ComfyUI Base URL. Additionally, you will want to setup SwarmUI with LAN access. After aforementioned adjustments, setting up SwarmUI to work with Sage WebUI will be the same as Step one: Configure Sage WebUI Settings as outlined above.
SwarmUI API URL
The address you will input as the ComfyUI Base URL will look like: http://<your_swarmui_address>:7801/ComfyBackendDirect
OpenAI DALL·E
Sage WebUI also supports image generation through the OpenAI DALL·E APIs. This option includes a selector for choosing between DALL·E 2 and DALL·E 3, each supporting different image sizes.
Initial Setup
- Obtain an API key from OpenAI.
Configuring Sage WebUI
- In Sage WebUI, navigate to the Admin Panel > Settings > Images menu.
- Set the
Image Generation Enginefield toOpen AI (Dall-E). - Enter your OpenAI API key.
- Choose the DALL·E model you wish to use. Note that image size options will depend on the selected model:
- DALL·E 2: Supports
256x256,512x512, or1024x1024images. - DALL·E 3: Supports
1024x1024,1792x1024, or1024x1792images.
- DALL·E 2: Supports
Azure OpenAI
Using Azure OpenAI Dall-E directly is unsupported, but you can set up a LiteLLM proxy which is compatible with the Open AI (Dall-E) Image Generation Engine.
Using Image Generation
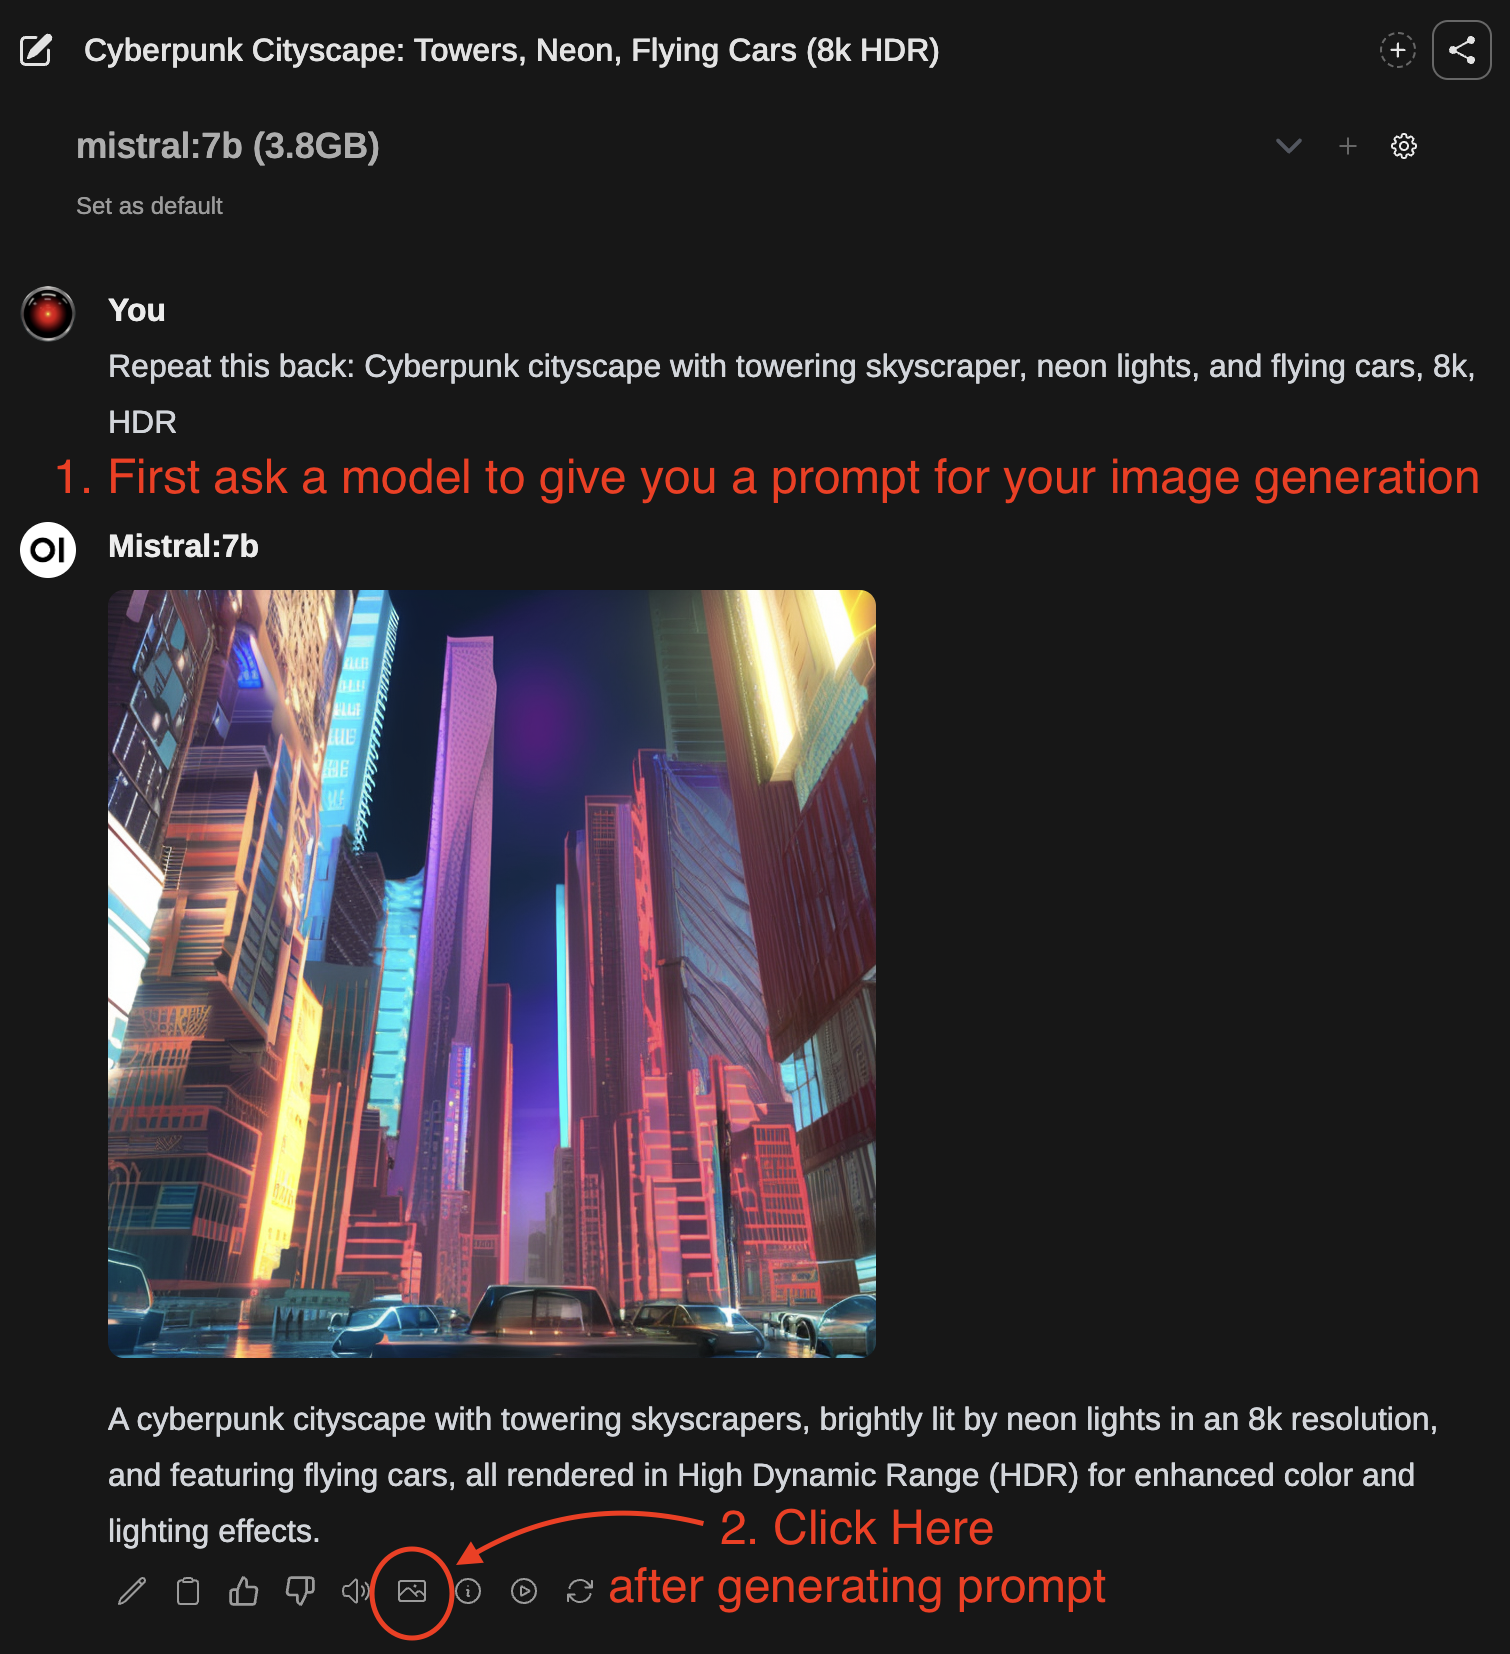
- First, use a text generation model to write a prompt for image generation.
- After the response has finished, you can click the Picture icon to generate an image.
- After the image has finished generating, it will be returned automatically in chat.
You can also edit the LLM's response and enter your image generation prompt as the message to send off for image generation instead of using the actual response provided by the LLM.